
Welcome to Paria's “Hike of the Week” series. Each of these posts highlights one of the best hikes from around North America. We hope this series inspires you to get out and experience these trails yourself!
This week's focus is on the Great Range Traverse in New York.
Featured Photo: Great Range by Mitchell Joyce
Why This Hike?
The Great Range Traverse lies in the beautiful Adirondack Park of northeast New York. This 6 million-acre park is the largest in the U.S. It's twice as big as the largest national park in the contiguous U.S.: Death Valley! With 2,000 miles of marked trails, the park offers a variety of hikes for all skill levels.
The Great Range Traverse is one of the premier backpacking treks in the area. Stunning views line the way, but be prepared. This is a challenging hike!
- Length: 21 miles
- Difficulty: Challenging
- Elevation gain: 9,500 feet
- Best time to visit: April through October
- 12 notable peaks can be found along the way. This includes Mt.Marcy, New York's tallest mountain (5,344 feet).
- A chance to bag 8 of the state's high peaks. (There are 46 altogether, if you're curious. All are in the Adirondacks.)
- This trail is in the serene Lake Placid region.
- You'll get amazing views of the surrounding mountains.
- Other highlights include bald summits with sweeping views, wooded mountain saddles, and steep, challenging slides.
- Optional side trips to Bushnell Falls and Sawteeth
- Option to stay at Johns Brook Lodge the second night. (Reservation required.)
- The Great Range Traverse is known as one of the toughest day hikes in America.
- While technically it is a point-to-point trail, it is less than 2 miles to walk back to where you began.
- Some people like to continue to the Adirondack Loj instead. But, this will require a shuttle back to your vehicle.
Before you pack your bags, keep the following in mind:
- The terrain is surprisingly difficult. You'll be channeling your inner mountain goat more than a few times.
- Bear canisters are required. Make sure to hang it properly. The black bears in the region have become experts on breaking into them.
- Trails are notorious for staying muddy in the Adirondacks.
- Cables and ladders assist in some steep areas. If you're afraid of heights, this may not be the hike for you.
- Water sources are scarce along the ridgelines
- Views may be shrouded by clouds
How Do I Get There?
Burlington International Airport is the closest major airfield to the Roostercomb Trailhead. The fastest route has tolls and a ferry. You can avoid the fees and tack on 10 minutes or less by heading further south and crossing over on VT-17 S. Going the latter route, take Airport Drive to Kennedy Drive for 1 mile. Use the middle lane to merge onto I-189W. Turn left onto US-7 S and continue 19 miles. Turn right onto VT-22A S and travel 7.5 miles. Turn right onto VT-17 W and continue 8.5 miles. Continue onto NY-185 W for 4 miles. After a series of jogs through Port Henry, turn left onto Tracy Road and continue 7.7 miles. Turn right onto US 9 N for a little over 2 miles. Make a slight left onto NY-73 W and continue 8.1 miles. The trailhead parking area will be on your left. The total drive time is about 1 hour and 45 minutes.
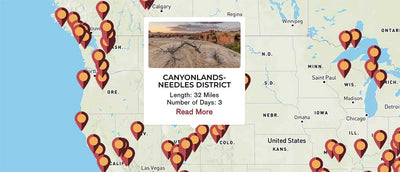
Map of Recommended Route
The following map outlines our recommended route. For even more detailed mapping, including being able to print a copy for yourself, click the "Open in CalTopo" button at the top of the map once it's loaded into view.
- Day 1 - Roostercomb Trailhead to Sno-Bird Camp: 9.5 miles
- Day 2 - Sno-Bird Camp to Johns Brook Lodge: 7.7 miles
-
Day 3 - Johns Brook Lodge to Phelps Trailhead: 3.6 miles
Trail Description
Day 1 - Roostercomb Trailhead to Sno-Bird Camp
Hopefully you like getting the hard parts of a trail out of the way first. Day 1 will be the most strenuous. After signing in near the trailhead, you'll pass by a small pond and begin your elevation gain through the forest. You'll come across a side trail to Snow Mountain and shortly Roostercomb. The latter is a short, but steep, side trail if you wish to take it.
The next mountain, Hedgehog, is relatively easy compared to the ones ahead. Unfortunately, it doesn't offer much of a view. After the saddle on the other side, your climb becomes much more strenuous. After summiting what some refer to as “Wolf Chin”, you'll reach another saddle. The following climb up Lower Wolf Jaw Mountain is extremely steep. But, the views keep getting better and better.
Another steep climb takes you to Wolf Jaw Notch. The trail to Upper Wolf Jaw starts out steep, but eventually calms down. Another col and precipitous terrain lead you to Armstrong Mountain. The easy descent between here and the Gothics is a nice break.
The views along the Gothics are some of the best in the whole park. Be prepared for an extensive cable-aided section on the descent. If you're up to it, you can take the side trail to Sawteeth. If not, continue the somewhat easier climb to Saddleback Mountain. Enjoy the views before heading down one of the sketchier parts of the trail. Head right back up to Basin Mountain. The views are great, but the descent down the backside is very steep. Luckily, you'll shortly reach camp for the night from here.
Day 2 - Sno-Bird Camp to Johns Brook Lodge
Start your second day with a bang by heading up the Haystack Mountains. The detour to them is a short distance from your campsite. Head south and first pass over Little Haystack before reaching main Haystack. The trail is very rocky, but also affords some of the best views in the Adirondacks.
Backtrack to the main trail and northwest a short distance before reaching the Phelps Trail. You'll make a left here and head towards the last highlight of your journey: Mount Marcy. Continue left when you reach the Van Houvenberg Trail. More exposed rock greets you. You'll scramble over and around some boulders before finally reaching the summit. The hardest part of your trek is over, so enjoy a break and the views here!
Head back up the trail where you first intersected with the Phelps Trail. Take a left on it, heading mostly north. You'll travel past Slant Rock before reaching the side trail to Bushnell Falls. It's yet another very short, but very steep area to get to. But, totally worth checking out if you're into waterfalls. Besides, you only have about 2 more miles before you reach camp for the evening. If you're not staying in John Brooks Lodge, you will notice that there is a primitive area as well for tent campers.
Day 3 - Johns Brook Lodge to Phelps Trailhead
Compared to your past two days, the three miles back to Keene Valley are relatively unremarkable. You'll have a few creek crossings and pass by several more shelters/lean-tos. The hike out of the valley is a bit steep, but not bad compared to past days' climbs. If you didn't stage a shuttle vehicle, you'll have a few more miles to go east and through Keene Valley to your vehicle.
What Will I Need?
April through October average highs range between 52° and 79°F. Lows range between 29° and 54°F. Weather can be damp and pop-up storms aren't out of the question. A lightweight, but durable tent will serve you well. The less weight the better on this difficult trek.
An ultralight sleeping pad and down sleeping bag will also come in handy to stay warm and save on pack weight. A compressible down pillow is a nice addition for better sleep.
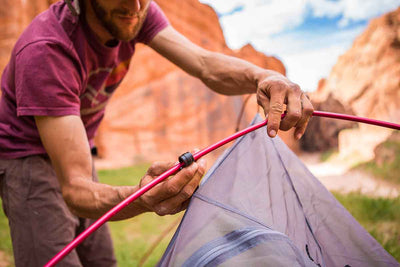
Consider some collapsible trekking poles for this trail. You'll want them for the steep inclines and rough terrain. But, you'll need both hands for the scrambles up precipitous rock faces, ladders, and cables.

A lightweight set of trekking poles, such as our Tri-Fold Carbon Cork trekking poles, are highly recommended for the steep and rocky terrain of the Adirondack Mountains.
SHOP NOWA titanium mug is an excellent item to hold hot brews on chilly, damp mornings.
Don't forget your bear canister! Again, black bears are active in this area and canisters are required.
If there's anything else you need to complete your pack, visit our full line of high-quality, affordable backpacking gear.
Shop Backpacking Tents
Shop Ultralight Tarps
Shop Backpacking Quilts
Shop Down Sleeping Bags
Shop Insulated Sleeping Pads
Shop Backpacking Pillow
Shop Folding Trekking Poles
Shop Titanium Cookware
Shop Tent and Tarp Accessories
Finally, to make sure you don't forget something at home, use our Ultimate Backpacker's Packing List. It even includes a convenient printable checklist!
Do I Need a Permit?
No permits are required. There is a $10 parking fee at both trailheads in Keene Valley.
Resources
Conclusion
If you're looking for a challenging hike that affords some of the best views in the Adirondacks, look no further than the Great Range Traverse. Have you completed this trail? What are your favorite trails in the Adirondacks?
Read Next
If you're looking for more hike ideas, read our "Best Backpacking Trips in the Eastern U.S." roundup post. Also, the following Hike of the Week articles cover other great hikes in the eastern U.S. and Canada.
Hike of the Week: Fundy Footpath
Hike of the Week: 100 Mile Wilderness
Hike of the Week: Presidential Range Traverse
For even more amazing backpacking trips visit The Trailhead, our interactive hike map. It contains a curated list of dozens of hikes, each with a detailed write-up like this one.

Finally, check out our comprehensive list of backpacking articles that cover just about everything there is to know about backpacking. If you're just starting out, our Backpacking 101 section covers all the basics. If you already have a few trips under your belt, you can find more advanced topics covered in our Expert Articles.


Leave a comment