
This is a weekly series that highlights an outstanding day hike or backpacking trip. The goal is to inspire you to want to get out and see these places for yourself. I know for us, just seeing amazing photos and reading about a great hike is enough to get us motivated.
This week's hike is the Skyline Trail in Canada's Jasper National Park.
Featured Photo: Maligne Lake (photo by Mark Smith)
Why this Hike?
If you are looking to explore the Canadian Rockies this season, look no further than the world famous Skyline Trail in beautiful Jasper National Park. This trail takes you well above tree line for the majority of your trek, giving you all the views of mountains and valleys that you could hope for.
- Total distance of 27.7 miles / 44.5 km
- Multiple accessible trailheads, easily reached via a shuttle
- Moderately difficult
- Multi-day hike (2-4 days), depending on starting location
- The trail is moderately busy during its short peak season, but empty in winter
- The seasons in the Canadian Rockies are short, so the trail can be crowded
- The weather can be volatile, so make sure to check the weather and plan accordingly
- The campsites require backcountry permits, so plan ahead
- Late July to Early September are the most popular times
- For easiest access, use the Jasper Maligne Shuttle, and start at the North end of the Maligne trail. They pick you up at the end of the hike and drive you round to the start, so you can jump in your car after your backpacking adventure.
How do I get there?
Luckily, Jasper National Park, and its neighboring Banff National Park, are world famous destinations, so accessing the park is relatively simple. We suggest coming to Jasper through Edmonton, Alberta. Edmonton is the nearest international airport, but you can also fly into Calgary International Airport.
Once you arrive in either town, you are going to want to either catch one of the many daily shuttle services or rent a car. It is a four-hour drive to the small but quaint town of Jasper, and then an additional 2 km east on Highway 16 to Maligne Lake road. You will cross a bridge, then stay left to follow the road for another 8 km towards the north parking lot located on the right. Unfortunately, there is no big sign that announces you've found the Skyline Trail, only a hiking emblem to let you know you’ve made it.
If you don’t have a car, reserve a ride with Jasper Maligne Shuttle. They leave the Town of Jasper at 9 a.m. and will take you to the start at Maligne Lake by 10:00 a.m.
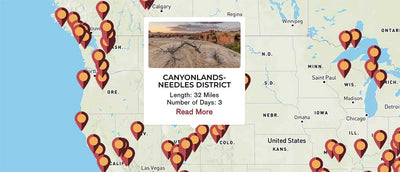
Map
The following map outlines our recommended route.
We recommend starting at Maligne Lake and making your way north. You can make the hike more difficult by choosing to start at Signal Mountain Trailhead and making your way south. This will add more elevation gain, so give yourself an extra day to complete the hike if you go this route.
- Day 1 - Maligne Lake to Snowbowl Campground (7.6 miles / 12.2 km)
- Day 2 - Snowbowl Campground to Tekarra Campground (11.3 miles / 18.2 km)
- Day 3 - Tekarra Campground to Signal Mountain Trailhead (8.9 miles / 14.3 km)
There are a few more campsites on the trail, but our recommended itinerary provides a good balance between the three days. The park does provide a great map of all of the campgrounds along the trail that allows you to develop your own plan.
Trail Description
Your first day is a gradual ascent from the attractive Maligne Lake. If you're hopping off the shuttle, you will be getting there around ten in the morning. Within a short time, you will start to see Lorrain Lake and then Mona Lake shortly after. This part is lush and full of fungi and moss.
If you had a late start, you can stop at the Evelyn Creek trailhead, which will be less populated. Past Evelyn Creek campground, keep working your legs up the ascent to Snowbowl campground. Along the way, you will see plenty of gorgeous flowing creeks.
Eventually, you'll find yourself staring at the Little Shovel campground where the views go from lush forests to alpine tundra. If you go at the end of summer, in early fall, gorgeous greens and vibrant wildflowers will line your path. You will definitely be surprised at such a gradual incline how quickly you clear the tree line and find yourself in colorful tundra. Snowbowl is a popular campsite in a well-sheltered meadow. It has easy access to water, and like all the campgrounds in Jasper, has bear boxes and poles.
Now that you have completed your first day, with a gradual elevation gain, light up your camping stove and cook a big dinner. Day two is all about elevation gain, it’s called Skyline for a reason! Note that you will need to bring along your backpacking stove as campfires are strictly forbidden in these campgrounds.
We suggest an early morning for your second day, as you will be ascending to the highest point, called The Notch. But first, you will be crossing beautiful meadows on your way through Big Shovel Pass. At this point, there is a side trail you can go down, called Watchtower trail, which allows for beautiful sights but adds to an already tough day. You can choose to extend your trip another day at this point by going up to Watchtower then back, and staying at the campground located at Watchtower. This is also the option to take if the weather turns ugly and you find yourself wanting to return to the start of the trail.
If you choose to push through then you will be descending for a while towards the Curator campground, take a rest here, as the rest of the way up will be laborious. The hardest part of the trail is known as The Notch, which can still have snow on it even in late summer months. As you push along, you will get beautiful mountain views, potentially some snowy banks, and be trekking along the summit of Amber Mountain. What makes the views so spectacular, is also one of the dangers of the hike, as this area is completely open and fully exposed. If there is lightning or other bad weather, do not attempt to cross.
After a brutal day of climbing up to The North, find yourself resting for the night at the Tekarra campground. This is a well-equipped campsite with access to a lush stream for refilling your water supply.
Your third day is going to feel like a breeze compared to the day before, and while you still have some distance to go, the windy descent along the fire road is going to be a welcome sight. Coming out of the Tekarra campground, you will continue a bit along the mountain ridge, and even enjoy some stream hopping and a bit of scrambling as you finish out the last bit of the Tekkarra mountain trail. However, you will soon find yourself back in a dense forest, surrounded by all the lush flora and fauna you saw the first day. In about four hours you will have reached your final destination.
What will I need?
Canadian national parks excel at having amenities on site for their numerous backpackers, and Jasper National Park is no exception. While this is a traditional pack in, pack out backpacking trip, you will find that the campgrounds all have access to stream water, bear boxes and poles, and plenty of space for you to set up shop. Three liters of water storage should be plenty sufficient for this hike. As in most places, you will want to filter your water, or use iodine tablets.
One important thing to note about this particular trail is that the weather can change rapidly at any time. If you are traveling from far away for this trip, make sure to pack extra rain equipment and cold weather gear, even in the summer! The area is exposed for a lot of the hike, so windbreakers, hats, and plenty of sunscreen are going to be essential. Remember to try and keep your pack as light as possible. For more on logistics, and what to bring, check out our Ultimate Backpacker's Packing List for a complete list of things that we recommend and a handy printable checklist.
Do I need a permit?
For this backpacking adventure, you will require a Jasper National Park Pass, and a backcountry reservation. Both can be found at the National Park Reservation Service website or calling them directly at 1-877-737-3783. In order to enter the park, you will also need to pay an entrance fee. Jasper National Park and the Skyline Trail are incredibly popular, so we recommend that you call up to six months in advance in order to reserve the campgrounds of your preference.
Resources
Jasper National Park Backpacking Reservation
Maligne Adventures Shuttle
Jasper Backcountry Map
Have you hiked the Skyline Trail or explored some of Jasper’s other wonderful trails? Do you have other outstanding hikes that you'd like us to write about? Please share your feedback in the comments.


Haha, yeah I did this trail several years ago in late August. We had bad weather on our big ascent day, and the following day. The photos of us pointing at the sign with driving snow and zero views are funny now. Really wish we could’ve had the views, though. After a decent overnight snow, we pushed on to get out of there a day early, and dayhike to get a good look at the Angel Wings glacier, near Mt Edith Cavell. Stop by the Bearpaw cafe for treats before or after! It’s an astounding region!
Leave a comment